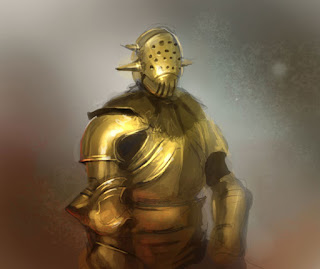
How to paint gold armor digital painting tutorial. Art tutorial, draw and paint Gold color Armor digital illustration photoshop concept art. Learn to Draw render and paint gold color Armor digital illustration free step by step and video online tutorial for comic manga, anime, and illustration sketch.
Step by step and video how to render metallic gold reflective surface and quick mark up background. Drawing and rendering technique for creating metal texture surface for character armor. The process shows from basic sketching to finish drawing quick character concept design. The video demonstrates and narrates how to quickly create an efficient sketch for character drawing into visual. The video shows you how to put together your concept idea onto visual character concept art.

Here are step by step still images:

Gold Armor Knight final color sketch

Watch the video process tutorial: How to paint gold armor (reflective) knight warrior.
Digital painting tutorials
- How to paint feathers
- How to paint metal
- How to paint gold
- How to paint wrinkle and fold on cloth
PREMIUM TUTORIAL:


-Draw and Paint Women Body Tutorial II: Female Manga Fusion II
-Character Design Tutorial: Dark Valkyrie
More Environmental tutorials:
-Environmental concept sketch, tunnel.
-One point perspective environment sketch for artists
-Two point perspective environment sketch for artists
-Three point perspective enviroment sketch for artists.
-Composition lesson for artists, rules of thirds.
** If you have any basic questions or specific please looked up Q/A section. Most of the time your questions has already been answered in Q/A.
If you need any help or support you can
-post questions or comment on the post (seems to be the fastest way to get response)
Peace,
Step by step and video how to render metallic gold reflective surface and quick mark up background. Drawing and rendering technique for creating metal texture surface for character armor. The process shows from basic sketching to finish drawing quick character concept design. The video demonstrates and narrates how to quickly create an efficient sketch for character drawing into visual. The video shows you how to put together your concept idea onto visual character concept art.
Knight in a Golden Armor final image:

Here are step by step still images:
Gold Armor Knight final color sketch
Watch the video process tutorial: How to paint gold armor (reflective) knight warrior.
Digital painting tutorials
- How to paint feathers
- How to paint metal
- How to paint gold
- How to paint wrinkle and fold on cloth
PREMIUM TUTORIAL:
-Draw and Paint Women Body Tutorial II: Female Manga Fusion II
-Character Design Tutorial: Dark Valkyrie
More Environmental tutorials:
-Environmental concept sketch, tunnel.
-One point perspective environment sketch for artists
-Two point perspective environment sketch for artists
-Three point perspective enviroment sketch for artists.
-Composition lesson for artists, rules of thirds.
** If you have any basic questions or specific please looked up Q/A section. Most of the time your questions has already been answered in Q/A.
If you need any help or support you can
-post questions or comment on the post (seems to be the fastest way to get response)
Peace,

Comments
Thanks for the tut :D
Thanks bro... keep posting vids
Peace!
Am I mistaken in thinking that designing armors is your main job at work?
Cya!
cya!
Chris> I am thinking the same thing, it does a bit. Yes, I do mainly design armor for all GW series. Glad you like the feature tutorial. :)
khaosphere> You are welcome, I hope I succeed I get my point across. And for sure there will be more Feature tutorial, but I have to come up with something good and different.
elhazardmx>> Hello there! Thanks for your support and everyone. And I hope all the tutorials around here, including the features help you out in some way. There will for sure be more and hopefully better.
nice to hear more people are getting
the feature tutorials. :)
Thanks bro!
luca> Perhaps...I will. ;)
your tutorial just is amazing!
I like it so much
but i am frustrated because i don't understand how you use the brushes
i was looking on the faq, there is some explications but not what i am looking for
do you have some tutorial about how you use the brushes?
i'm some new on how to use the brushes with my genius mouse pen 6x8
thanks for readme, and congratulations
you made an excelent work!!!
Good Luck!
Peace!
Luca> LOL, thank brother. It's true, and I am glad those tutorials help you guys and gals out in many ways. Thanks for your support and kind words.
Peace! :)
I have a similar question to Shaka, but slightly more specific. I can see from your excellent feature tutorials that you do indeed mainly use the default Photoshop brushes, but I was wondering whether you often have opacity or flow tablet sensitivity (or both) enabled and also what brush spacing do you normally use?
I understand that there's no magic formula that will enable a novice like me to paint as well as a highly skilled artist such as yourself, but it would be nice to try and start on the right foot.
The default brush have check *shape dynamics, *other dinamics, *smoothing. Spacing is default as it comes...I don't tweak them at all unless I make a new brush.
As for Flow, I don't change it at all because I don't like Airbushy looks...I like gritty, rough and painterly look.
Opacity I do change (if you watch most of the video I often talk about it a lot, especially in the older ones) to be 30%, 70% then 100% as the stage progress. 30% is early stage to find values, 70% when I am sure I have the right stuff, then final mostly 100% so the pic don't get muddy.
Then...here and there different opacity as it fits the images.
Also layers, you have to play around with them...the more you play, then you learn...then you will just take what you need to complete your project.
There are still many more stuff in PS that I don't know, and hardly ever need. I try to minimize the complexity and just take precisely what I really need and economize the process.
Thanks for the comment!
Come back again soon!
Peace!
http://khaosphere.wordpress.com/2008/10/13/la-mascara-del-toro/
Cheers!
I'm an architect but I'd rather be doing what you do a thousand times.
I have no experience in digital painting, although I do know some photoshop.
I've decided that I'm going to buy a Wacom tablet and purchase your featured tutorials and see how far I can go. I think I'll be more satisfied doing some art on the side, even as a hobby, than architecture.
Thanks
Anyway, you assume your perspective drawing is at the superb level since you are an architect? Nice, you should be flying in doing environmental concept and such!!! But figures is different, it would take you a while. There is this architect guy at my life drawing session, he's been going for years and he's better than a lot of people I have seen (and I've seen a lot). So Congrat! You will love the wacom and keep doodling and pursuing what you want! I was a numbers cruncher before I decided to be come a commercial artist. Good luck!
Post a Comment